Mastering Next.js Error Handling with the App Router

In this article, we’ll learn how to handle errors in Next.js with the App Router and new error file conventions in Next.js.
Error handling is a key aspect of developing any web application, and in the past Next.js has helped developers with that experience through custom error pages like 404 and 500 pages.
However, these pages have their limitations within the Pages Router, such as limited support for specific UI integrations, outdated support for React error boundaries, and limited app functionality when errors occur.
But with the release of Next.js version 13.4, the new App Router has been marked stable for production. The App Router improves support and the developer experience for error handling and other essential parts of building web apps.
The Scenario and Setting Up
To facilitate understanding the new error-handling API, we’ll explore its implementation within a Next.js app for user authentication.
User authentication is prone to many errors, so learning how to handle errors in this context will stand you in good stead when you’re building other apps.
Before we start, get the code for the demo app we’ll be using in the article by cloning the repo linked here (on the main branch). Once you run the app, you should see the error pictured below.
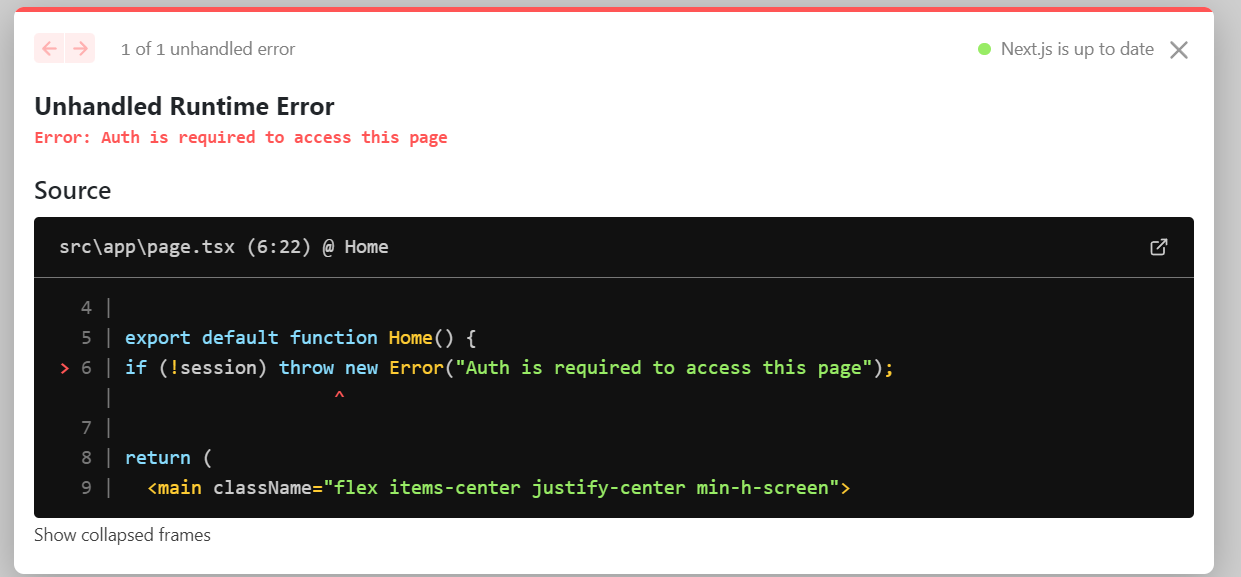
In this demo app, the main page — which displays a table — can only be accessed by logged-in users, but some error (in this case man made, but it could legitimately happen) has occurred, and has led to the session variable being assigned as null.
Note: authentication won’t be implemented in the demo app for the sake of simplicity.
This of course leads to an error, and right now, the app completely crashes, because it doesn’t know how to handle the error!
Now we’ll learn how to handle that error to prevent our app from crashing, thereby significantly improving the UX of the app.
Creating the Error Page
To prevent the app from crashing, in the app/ directory, create an error.tsx file. The creation of this file automatically creates a React error boundary that wraps the main page. Then, in the error.tsx file, export the following function:
"use client";

export default function Error() {
  return (
    <div className="grid h-screen px-4 bg-white place-content-center">
      <div className="text-center">
        <h1 className="font-black text-gray-200 text-9xl">401</h1>

        <p className="text-2xl font-bold tracking-tight text-gray-900 sm:text-4xl">
          Unauthroized!
        </p>

        <p className="mt-4 text-gray-500">
          You must be logged in to access the page
        </p>

        <button
          type="button"
          className="inline-block px-5 py-3 mt-6 text-sm font-medium text-white bg-indigo-600 rounded hover:bg-indigo-700 focus:outline-none focus:ring"
        >
          Try Again
        </a>
      </div>
    </div>
  );
}
Note: error components must be client components! Be sure to mark them as such.
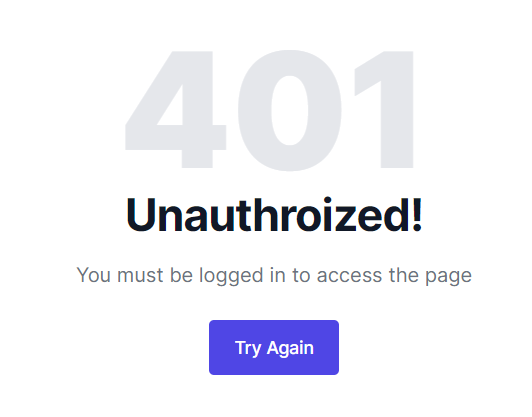
The function exported will act as a fallback component. If an error is thrown within the boundary, the error will be caught and the fallback component will be rendered, which should appear as shown below.
Two props are passed to the error fallback component when an error happens — the error object itself, and a function to try to recover from the error (usually called reset):
"use client";

type ErrorProps = {
  error: Error;
  reset: () => void;
};

export default function Error({ error, reset }: ErrorProps) {
  // ...
}
We can now access the error message through the error prop and display it on the screen as follows:
<p className="mt-4 text-gray-500">
  {error.message || "You must be logged in to access the page"}
</p>
The reset function will try to rerender the original content surrounded by the error boundary when the function is called. If that’s successful, the fallback error component will be replaced with the contents from the rerender.
We can implement the reset function call in our button with an onClick handler:
<button
  type="button"
  onClick={() => reset()}
  className="inline-block px-5 py-3 mt-6 text-sm font-medium text-white bg-indigo-600 rounded hover:bg-indigo-700 focus:outline-none focus:ring cursor-pointer"
>
  Try Again
</button>
And with that, we have successfully managed to handle our error!
Abstracting the Error Message
In an actual app with user authentication, there will likely be many routes that must be protected, which requires multiple instances of the same auth error message in case an auth error happens.
To abstract the error message (and not write it multiple times), we can easily create a custom exception relating to authentication.
To do this, create a directory called lib and create a file in that directory called exceptions.ts. In that file, we can create and export the custom auth error exception as follows:
export class AuthRequiredError extends Error {
  constructor(message = "Auth is required to access this page") {
    super(message);
    this.name = "AuthRequiredError";
  }
}
We can now throw this new custom AuthRequiredError on the main page instead of the regular Error:
export default function Home() {
  if (!session) throw new AuthRequiredError();
  // ...
}
The error will give us either the default message passed in the constructor or a more specific error that we may need to pass later on.
More About Error Handling
Let’s end with some extra things to note about errors in layouts and server errors.
Errors in Layouts
Eerrors can happen anywhere in an app (not just page.tsx files), and the file routing system Next.js uses influences how error.tsx boundaries work across nested routes and layouts.
Errors bubble up to the nearest parent error boundary, which can be seen in the diagram below.
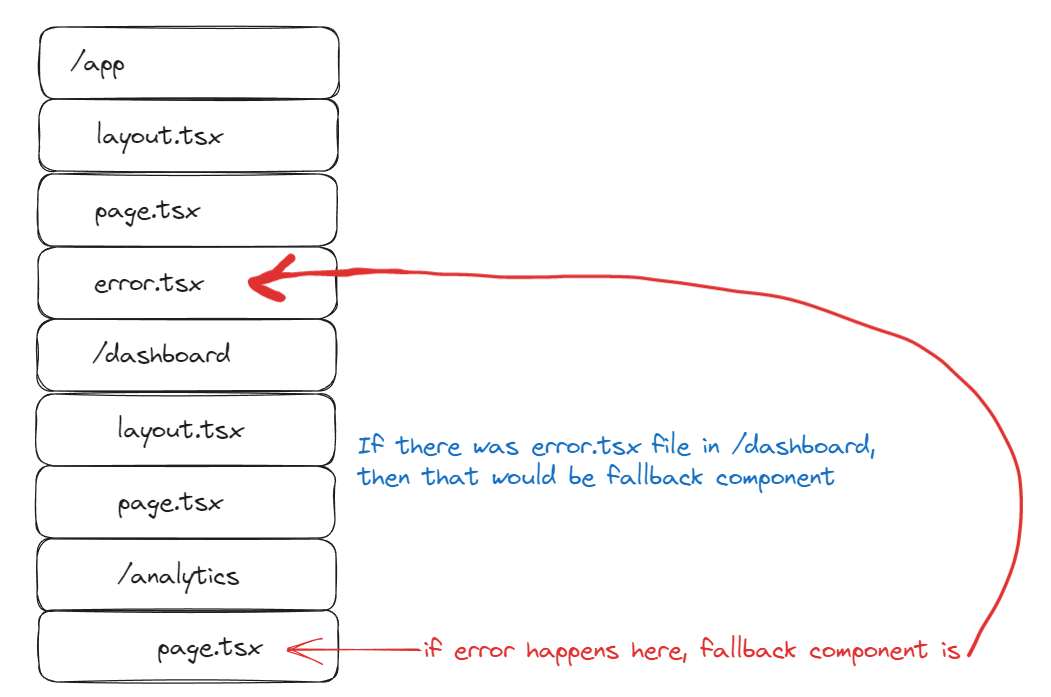
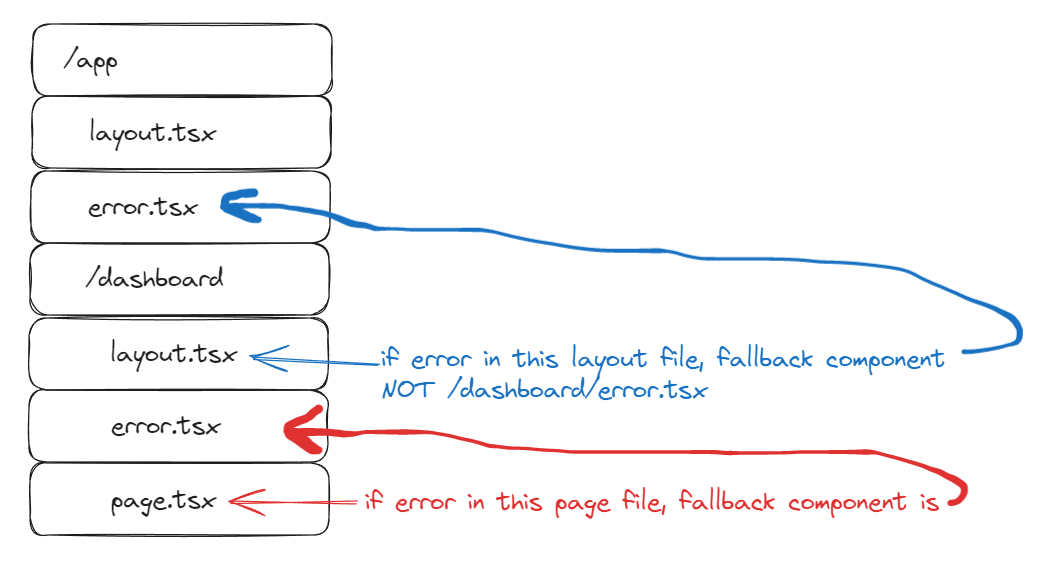
This error-bubbling nature means that an error.tsx boundary won’t catch an error in a layout file on the same segment, because the error boundary wraps the layout file.
If an error occurs in the root layout or template, use a global-error.tsx file, as pictured below.
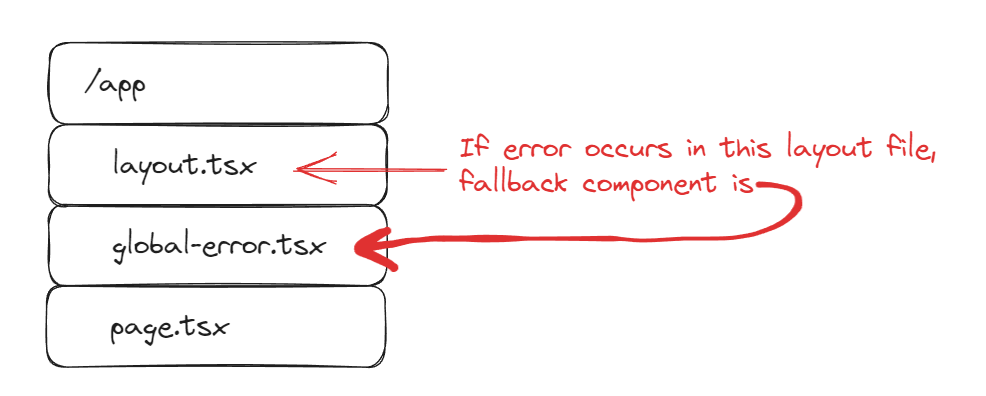
The global-error.tsx boundary wraps the entire app, so be sure to add your own unique <html> and <body> tags when using this file.
This error boundary catches any errors that weren’t caught by other nested error.tsx boundaries, and as such it won’t be activated often.
Server Errors
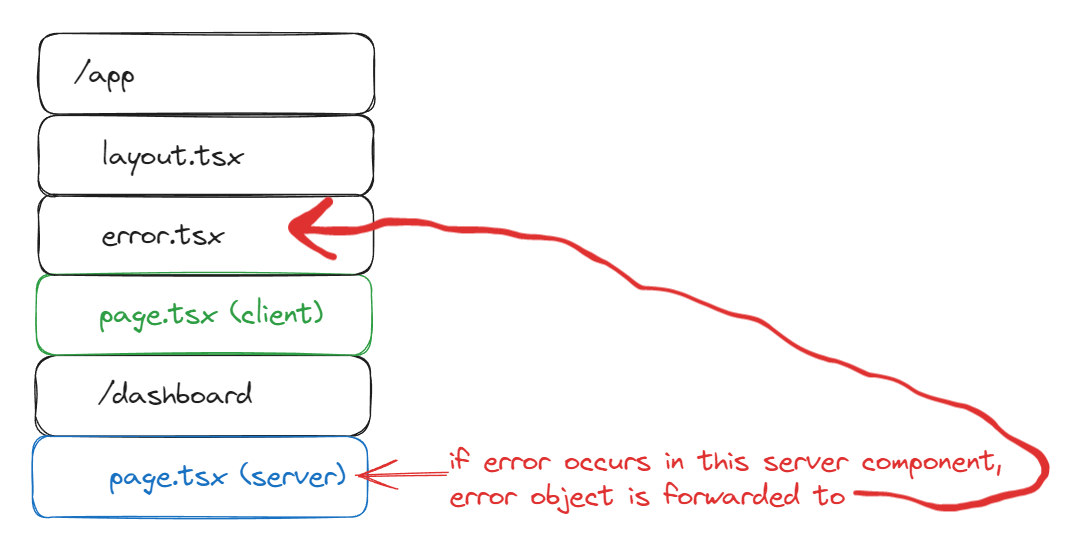
In case an error occurs in a server component or while data fetching, Next.js will forward the corresponding Error object to the nearest error.tsx boundary.
Conclusion and Next Steps
Although many developers view implementing error handling as a hassle, it’s a vital part of an app, and successfully implementing error handling will significantly improve the app’s UX.
Next.js makes it incredibly simple to do this with the help of the App Router and the error.tsx file convention.
You can consult the Next.js docs on error handling to learn more about error handling, and you can view the finished code from this article on GitHub.